
All The Technical Stuff!
Not sure How To Create a website? Or track your solo ads campaign?.. We'll cover all of that in this section
1 - Solo Ad Buying Strategy
Sample Squeezepage : LINK HERE
2 - Create A Free Auto Responder Account
An Autoresponder is a tool that collects emails and set messages to go out automatically. They help automate your campaigns and manage one-to-one communications with your recipients an is a VITAL tool for anyone looking to build their list.
Step 1 : Register for a Free Autoresponder Account Here. I highly recommend Aweber because to date has the best delivery rate.
Step 2: Set your Autoresponder to SINGLE OPT -IN
Before you begin buying traffic make sure that you have set your autoresponders to
1) Only COLLECT EMAILS! ( this will ensure higher Opt-in rates)
We only need to collect emails, no need to collect Names, so whenever you create a form (either on getresponse or Aweber) make sure the form only collects emails.
2) Turn off Confirmed Opt In/ Double Confirmed Opt in
By turning off confirmed opt in, your subscribers are NOT required to click a confirmation link to confirm that they want to be in your list remember ALWAYS disable/turn off Confirmed Opt-in
To turn Off on Aweber
Go to List Options>> List Settings>> Confirmed Opt in & Scroll down till you see Require Opt-in and Turn off as below.

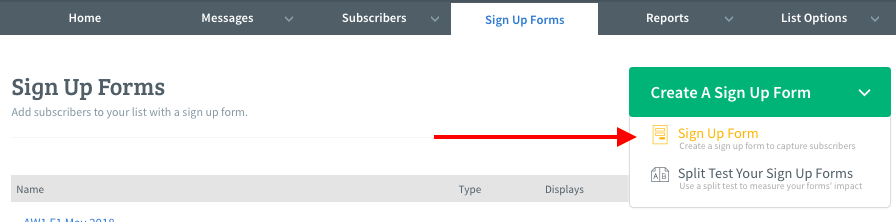
3 - Create Your Squeezepage/ Lead Capture Page
To create your Squeezepage within Aweber login to your aweber account and create new signup form (shown below)
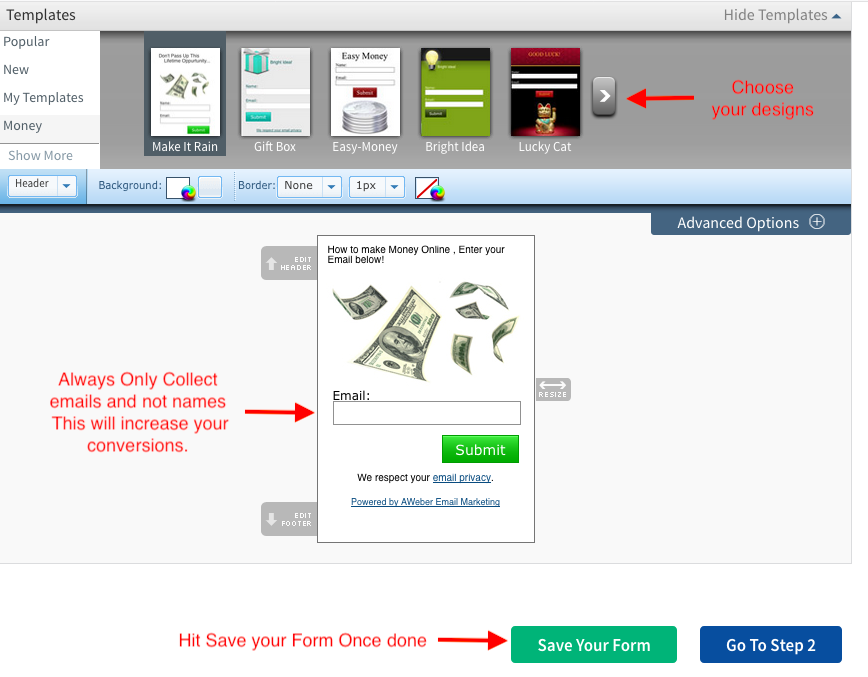
Next you'll see a signup page builder , simply design your squeezepage from the number of templates to choose from.
TIP: remember to only collect emails and not names and phone numbers etc. This will increase your conversions!
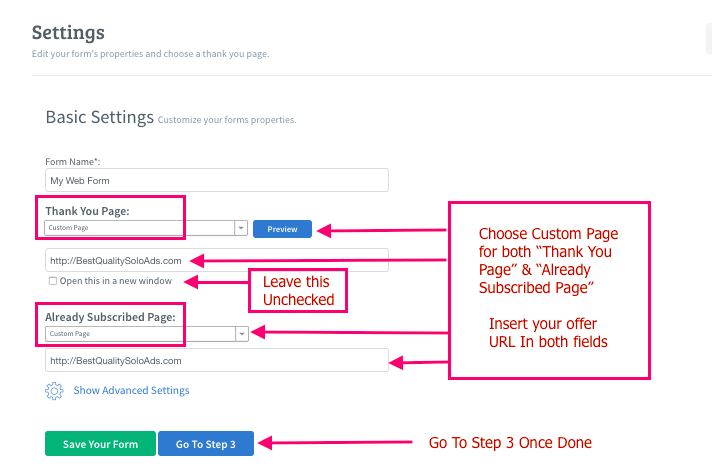
4 - Connect Your Squeezepage To Your Offer
Next you will see a screen below ( follow the instructions)
Thank you page : choose custom page and insert your “Offer Page” url
Already subscribed page: choose custom page and insert your “Offer Page” url
Let me explain what we’re doing here, we’re telling the webform to redirect the visitor
who opted in to be redirected automatically to your “Offer Page Url“. (Regardless for
those who are already subscribed to your list or not).
5 - Publish your Squeezepage
Once done hit “Go To Step 3” and you will see something like the screenshot below
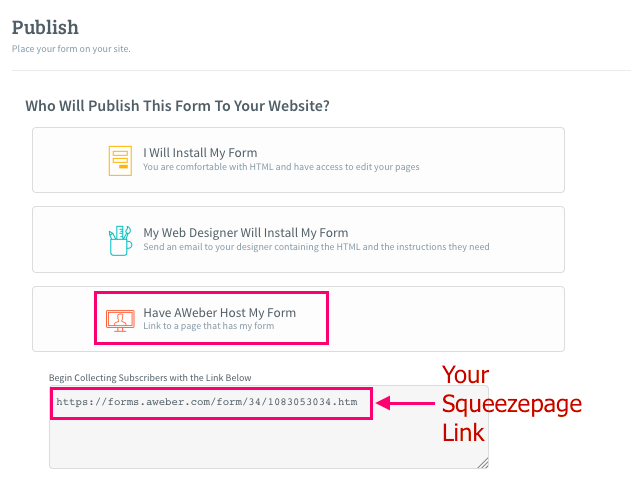
Copy the link above, this is the link you will send traffic to. Please be sure to test your Squeezepage before buying traffic.
Tracking Your Solo Ad Buys
Tracking Your Solo Ad Buys performance is extremely important. You need to know the % of Opt-ins and the Quality of your traffic. To do this we use a Click tracking tool.
Step 1: Create Your Free tracking Tool CLICK HERE
We are going to prepare 2 links and You will need to give The traffic vendor 2 links
1) ClickMagic Tracking link. (which links to your squeezepage) This is the link that your seller will send clicks to.
2) Your “Public Stats” link which will only be used for the seller to see your optin rates and how many clicks you’ve received etc. IMPORTANT: TRAFFIC WILL NOT BE SENT TO THIS LINK!
Before you begin creating a tracking link I Need you to first go to your Squeezepage URL and just add this at the end of the URL ?/subid=sellername
For example if your squeezepage URL is
http://yourwebsite.com/squeeze , It now will look like this
http://yourwebsite.com/squeeze?/subid=sellername
Step by Step Creating a Tracking Link For Your seller
1) Link Name = I structure it with Seller name + number of Clicks bought
2) Primary Link which is your squeeze page URL + ?/subid=sellername (See my example below)
3) Hit Create Link
![]()
Next you will see something like the screenshot below . go to the “GEAR” Icon on the link you just created
And click on
1) Copy Tracking Link
2) Public Stats Link
As shown below
![]()
From the example above my
1) Tracking link is = http://website.com/Sellername100-Date
2) Public Stats link is = http://www.clickmagick.com/share/22240228832
Example
Your squeezepage URL is http://yourwebsite.com/squeeze and your custom domain name is website.com
AND you buy clicks from the following people
Purchase 1)100 clicks From JOHN on December 4
Purchase 2)200 clicks From BOB on December 5
Purchase 3)500 clicks From MARY On December 6
Custom tracking Link for Purchase 1 ( 100 clicks From JOHN on December 4)
Primary url = http://yourwebsite.com/squeeze?/subid=JOHN
Trackinglink =http://website.com/john100-12-4
Custom tracking Link for Purchase 2( 200 clicks From BOB on December 5)
Primary url = http://yourwebsite.com/squeeze?/subid=BOB
Trackinglink =http://website.com/bob200-12-5
Custom tracking Link for Purchase 3( 500 clicks From MARY on December 6)
Primary url = http://yourwebsite.com/squeeze?/subid=MARY
Trackinglink =http://website.com/MARY500-12-6
IMPORTANT JUST TO BE VERY CLEAR HERE.:
When you buy traffic from multiple vendors/solo ad sellers all you need to do is just create a new tracking link following the step above. You DO NOT need to create new Pages or new tracking pixels!